As mentioned in a previous article, Laravel is a popular PHP development platform that is well known for its clean design and the active user community. Gitlab is one of the most popular source code repository and collaborative software development platforms. This article outlines how to use Gitlab’s pipelines with Laravel projects.
First you will need to declare the main stages in the pipelines process such as: Build, Test and Deploy.
Build (Preparation and Setup)
The instructions below assume that you have docker installed an understand how it works with Gitlab. If you are unsure, take a look at our blog on setting up docker.
The steps for preparation and setup are:
Setup a Docker Container Image
GitLab CI/CD (https://docs.gitlab.com/ee/ci/) allows to use Docker (https://www.docker.com/) engine to handle the process of testing and deploying an application so you’ll have to pickup a base Docker image to use or create one. There are many Docker images available for PHP/Laravel applications. For example, the official PHP Docker image (https://hub.docker.com/_/php).
Once a container is created and a Dockerfile if placed in the root directory of your app you’ll need to set up the GitLab Container Registry, build an image and place it there for later use.
To set up the Container Registry on your GitLab project repository navigate to the Registry tab or if you can’t find it you may need to enable it for your project under your project’s Settings > General > Visibility, project features, permissions.
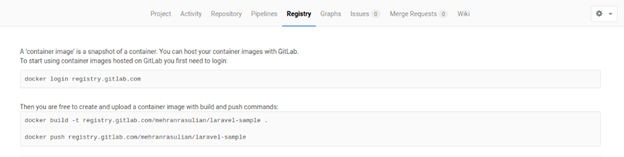
Fist you will need to sign in to the GitLab registry using your GitLab username and password. Given the Docker is installed on our machine, you will need to run the following commands:
docker login registry.gitlab.com
Then you can build and push your image to GitLab:
docker build -t registry.gitlab.com/<USERNAME>/<IMAGE_NAME> .
docker push registry.gitlab.com/<USERNAME>/<IMAGE_NAME>
Now you can use this image in order to build and test your application with GitLab CI/CD which requires a file called .gitlab-ci.yml created in the repository’s root starting with the following commands to use the image previously registered:
image: registry.gitlab.com/<USERNAME>/<IMAGE_NAME>:latest
Add additional services to your GitLab pipeline.
he approach of adding multiple services to your GitLab pipeline depends on the specific needs of your project, and both the services keyword and Docker Compose (https://docs.docker.com/compose/) have their own advantages.
The services keyword is a simpler approach that allows you to easily add a limited number of services to your GitLab pipeline. It’s suitable when you only need a few simple services, such as a database or cache server, and you don’t need to manage them in a more complex way. The services keyword is also a built-in feature of GitLab and doesn’t require you to install any additional tools or write any additional configuration files.
On the other hand, docker-compose provides more flexibility and functionality in managing multiple services. It allows you to define complex service configurations, such as multiple versions of a service, networks, volumes, and dependencies. Additionally, you can easily manage your services using docker-compose commands, which can simplify your pipeline’s configuration.
Overall, if you have a more complex application architecture and need to manage multiple services, using docker-compose would be a better approach. However, if you only need to use a few simple services and want a quick and easy solution, the services keyword is a suitable option. It’s important to choose the approach that best fits the needs of your project.
Here’s an example of how to add a MySQL service to a GitLab CI/CD pipeline for a Laravel application using the services keyword:
services:
- mysql:latest
variables:
MYSQL_DATABASE: my_app_db
MYSQL_ROOT_PASSWORD: example
DB_HOST: mysql
DB_USERNAME: root
DB_PASSWORD: example
In this example, we use the services keyword to specify the MySQL Docker image that will be started alongside the primary image.
Next, we define some environment variables that are used to configure our Laravel application to connect to the MySQL service. We set the MYSQL_DATABASE variable to the name of the database that we want to create, and MYSQL_ROOT_PASSWORD to the password that we want to set for the root user. We also set the DB_HOST, DB_USERNAME, and DB_PASSWORD variables to configure Laravel’s database connection.
Install application dependencies (packages required by Laravel Framework):
To install dependencies required by Laravel framework in GitLab pipeline, you can use the composer package manager. Here’s an example:
script:
- apt-get update && apt-get install -y git unzip
- curl -sS https://getcomposer.org/installer | php -- --install-dir=/usr/local/bin --filename=composer
- composer install --prefer-dist --no-ansi --no-interaction --no-progress
In this example, we first install some dependencies that are required to run composer. We then download and install composer itself. Finally, we run composer install to install the dependencies required by Laravel, using some additional flags to improve the performance of the installation.
Set up the Laravel application environment and generate an environment key:
To pass database credentials to the .env file of a Laravel application in a GitLab pipeline, you can use GitLab’s CI/CD variables mentioned above to store the sensitive information and then use them in the pipeline script to update the .env file with the correct credentials.
Here’s an example of how you might do this:
In your GitLab project’s settings, navigate to “CI/CD” and “Variables”. Here, you can add variables for your database credentials, such as DB_HOST, DB_DATABASE, DB_USERNAME, and DB_PASSWORD.
In your .gitlab-ci.yml file, add a job to update the .env file with the database credentials. Here’s an example:
build:
stage: build
script:
- cp .env.example .env
- php artisan key:generate
- sed -i "s/DB_HOST=.*/DB_HOST=${DB_HOST}/" .env
- sed -i "s/DB_DATABASE=.*/DB_DATABASE=${DB_DATABASE}/" .env
- sed -i "s/DB_USERNAME=.*/DB_USERNAME=${DB_USERNAME}/" .env
- sed -i "s/DB_PASSWORD=.*/DB_PASSWORD=${DB_PASSWORD}/" .env
In this example, we define our database credentials as CI/CD variables. In the build job, we copy the .env.example file to create a new .env file, generate a new application key, and then use sed to update the database credentials in the .env file.
Note that the sed commands in the example replace the entire line that starts with DB_HOST=, DB_DATABASE=, DB_USERNAME=, or DB_PASSWORD= with the corresponding value from the CI/CD variables. If your .env file has a different format, you may need to adjust the sed commands accordingly.
Set up the Database and run Migrations:
In a GitLab pipeline, it’s recommended to create the database and run migrations before running the tests and deploying the application. This ensures that the database schema is up-to-date with the codebase and that the tests are running against the latest database schema.
The steps involved in creating the database and running migrations may vary depending on the specific requirements of your application and the tools you’re using. However, typically, this would involve running the following commands in your pipeline:
- Create the database (if it doesn’t already exist):
mysql -u<DB_USERNAME> -p<DB_PASSWORD> -e "CREATE DATABASE <DB_NAME>"
Note: Replace <DB_USERNAME>, <DB_PASSWORD>, and <DB_NAME> with the appropriate values for your database.
2) Run the migrations:
php artisan migrate --force
You can add these commands to your pipeline’s before_script section, so they are run before any other commands in the pipeline.
Setup GitLab Cache and Artifacts (https://docs.gitlab.com/ee/ci/caching/#cache-vs-artifacts).
GitLab provides a caching mechanism that can be used to speed up your pipeline by caching files and dependencies between pipeline runs. You can also use artifacts to pass data between jobs in the pipeline. For example:
cache:
paths:
- vendor
In this example, we add the vendor directory to the paths section of the cache configuration. This will cache the vendor directory between pipeline runs.
In the build job, we run the same build steps as before, but we don’t install dependencies using composer because we can use the cached vendor directory.
By caching the vendor directory, you can significantly speed up your pipeline and avoid the need to reinstall dependencies on each pipeline run.
A GitLab pipeline executes several jobs, stage by stage, with the help of automated code. A continuous integration pipeline involves building something from the scratch and testing the same in a development environment.
Test (Syntax and Security Checks)
One of the advantages of using a pipeline is the ability to run a series of tests before code is deployed to the main codeline. Examples include tests for things like unit code functionality, syntax and security.
There are a lot of syntax checkers out there, some of the ones we like are:
- PHP-CS-Fixer (https://github.com/PHP-CS-Fixer/PHP-CS-Fixer)
You can install it using Composer and it has a .php_cs config file that you can commit to your repository. Run php-cs-fixer fix to check and fix all issues in your repository.
Laravel Framework uses StyleCI to automatically check for code style issues on new commits and pull requests. It can notify you when it finds issues, automatically send fixes through pull requests, and automatically commit fixes. However, it is free only for open-source projects.
- PHP Code Sniffer (https://github.com/squizlabs/PHP_CodeSniffer)
PHP Code sniffer (phpcs) is a style checker which ships with various popular PHP styles such as PEAR, PSR2 etc. It can check for indentation, missing comments, naming conventions, etc. and also includes phpcbf, a program that can automatically fix some problems.
- PHP Mess Detector (https://phpmd.org/)
PHP Mess Detector (phpmd) checks for code smells: awkward, overcomplicated or unused code and ships with several built-in rules than can be enabled or disabled.
To illustrate an example of how to setup a syntax checker in the pipeline will we use PHP-CS-Fixer:
php-cs-:
stage: test
dependencies:
- composer
script:
- ./vendor/bin/php-cs-fixer fix --config=.php_cs.php --verbose --diff --dry-run
There are also many examples of security checkers available. Some of the ones we like are:
- Local PHP Security Checker (https://github.com/fabpot/local-php-security-checker)
It is a Go based command line tool that checks if your PHP application depends on PHP packages with known security vulnerabilities. Published by Fabien Potencier (fabpot) a founder of the Symfony project. It uses the Security Advisories Database behind the scenes (https://github.com/FriendsOfPHP/security-advisories). This directory is updated daily with the latest CVEs and is a great place to start checking.
- SAST Analyzer based on phpcs-security-audit (https://gitlab.com/gitlab-org/security-products/analyzers/phpcs-security-audit)
This analyzer is a wrapper around phpcs-security-audit, a set of PHP CodeSniffer rules that finds vulnerabilities and weaknesses related to security in PHP code.
To illustrate an example of how to setup a security checker in the pipeline we will use Fabpot’s local-php-security-checker. This can be integrated into your container and run within your CI environment using the following steps:
# Releases https://github.com/fabpot/local-php-security-checker/releases
ARG URL="https://github.com/fabpot/local-php-security-checker/releases/download/v2.0.6/local-php-security-checker_2.0.6_linux_amd64"
RUN apk add --no-cache wget
RUN wget -O local-php-security-checker $URL
RUN chmod +x ./local-php-security-checker
RUN mv ./local-php-security-checker /usr/local/bin/
script:
- local-php-security-checker
Test (Unit Tests)
Unit Testing is the process of checking small pieces of code to speed your testing strategies. These unit tests are automated to reduce time for overall testing and improve the reliability of the system. As code is added to new systems it’s possible to break previously created tasks. Adding these unit tests to the build process allows programmers to catch errors before they make it into the main codeline.
Examples of unit test frameworks are:
- PHPStan (https://phpstan.org/)
PHPStan is PHP Static Analysis Tool which focuses on finding errors in your code without actually running it. It catches whole classes of bugs even before you write tests for the code.
PHPUnit is a unit testing framework for the PHP programming language. Laravel uses PHPUnit for tests by default.
We will use both Larastan (a PHPStan wrapper for Laravel – https://github.com/nunomaduro/larastan) to perform static analysis on the projects and PHPUnit to run the Unit Tests:
phpunit:
stage: test
script:
- phpunit --coverage-text –colors=never
- vendor/bin/phpstan
Deploy (Deployment)
Deployment is when the code is push into the main codeine and out to a staging or production server. For convenience we’ll only work with the staging job for now since it will be very similar to the production job.
First, we will need to initialize an SSH connection by doing the following:
- Create a new SSH key pair locally on our machine.
- Give the public key to our server.
- Give the private key to GitLab using secret variables.
- Use that private key in our pipelines.
Once it’s done, we can deploy the application to the staging host.
There are a few deployment tools available to manage the process:
- Laravel Envoy (https://laravel.com/docs/9.x/envoy)
Laravel Envoy is a tool for executing common tasks you run on your remote servers. Using Blade style syntax, you can easily setup tasks for deployment, Artisan commands, and more.
- Deployer (https://github.com/deployphp/deployer)
Deployer is a PHP package that provides automatic server provisioning, zero downtime deployments, rolling back to a previous release, and ready-to-use recipes for the major frameworks and some PHP applications.
We will use Deployer:
First, we need to install Deployer:
composer require deployer/deployer:^7.0
Next, we will initialize Deployer and choose the Laravel project recipe which will auto-generate a deploy.yaml or deploy.php configuration file:
dep init
Now you can look through the deploy file and change all the needed params to the configuration of your application.
We have already installed Deployer, installed SSL certificates to the staging server, and made the deployment script, so finally it is time to pull it all together and make the first deployment to staging:
dep deploy
You should see a new folder structure in your host, where it has releases folder. Deployer syncs your code to your server, runs your tasks and then creates a symlink which links the current to the enabled release.
If anything goes wrong, you can always roll back to the previously deployed version:
dep rollback